Standing Rigging

Chainplate Fabrication: Part 2

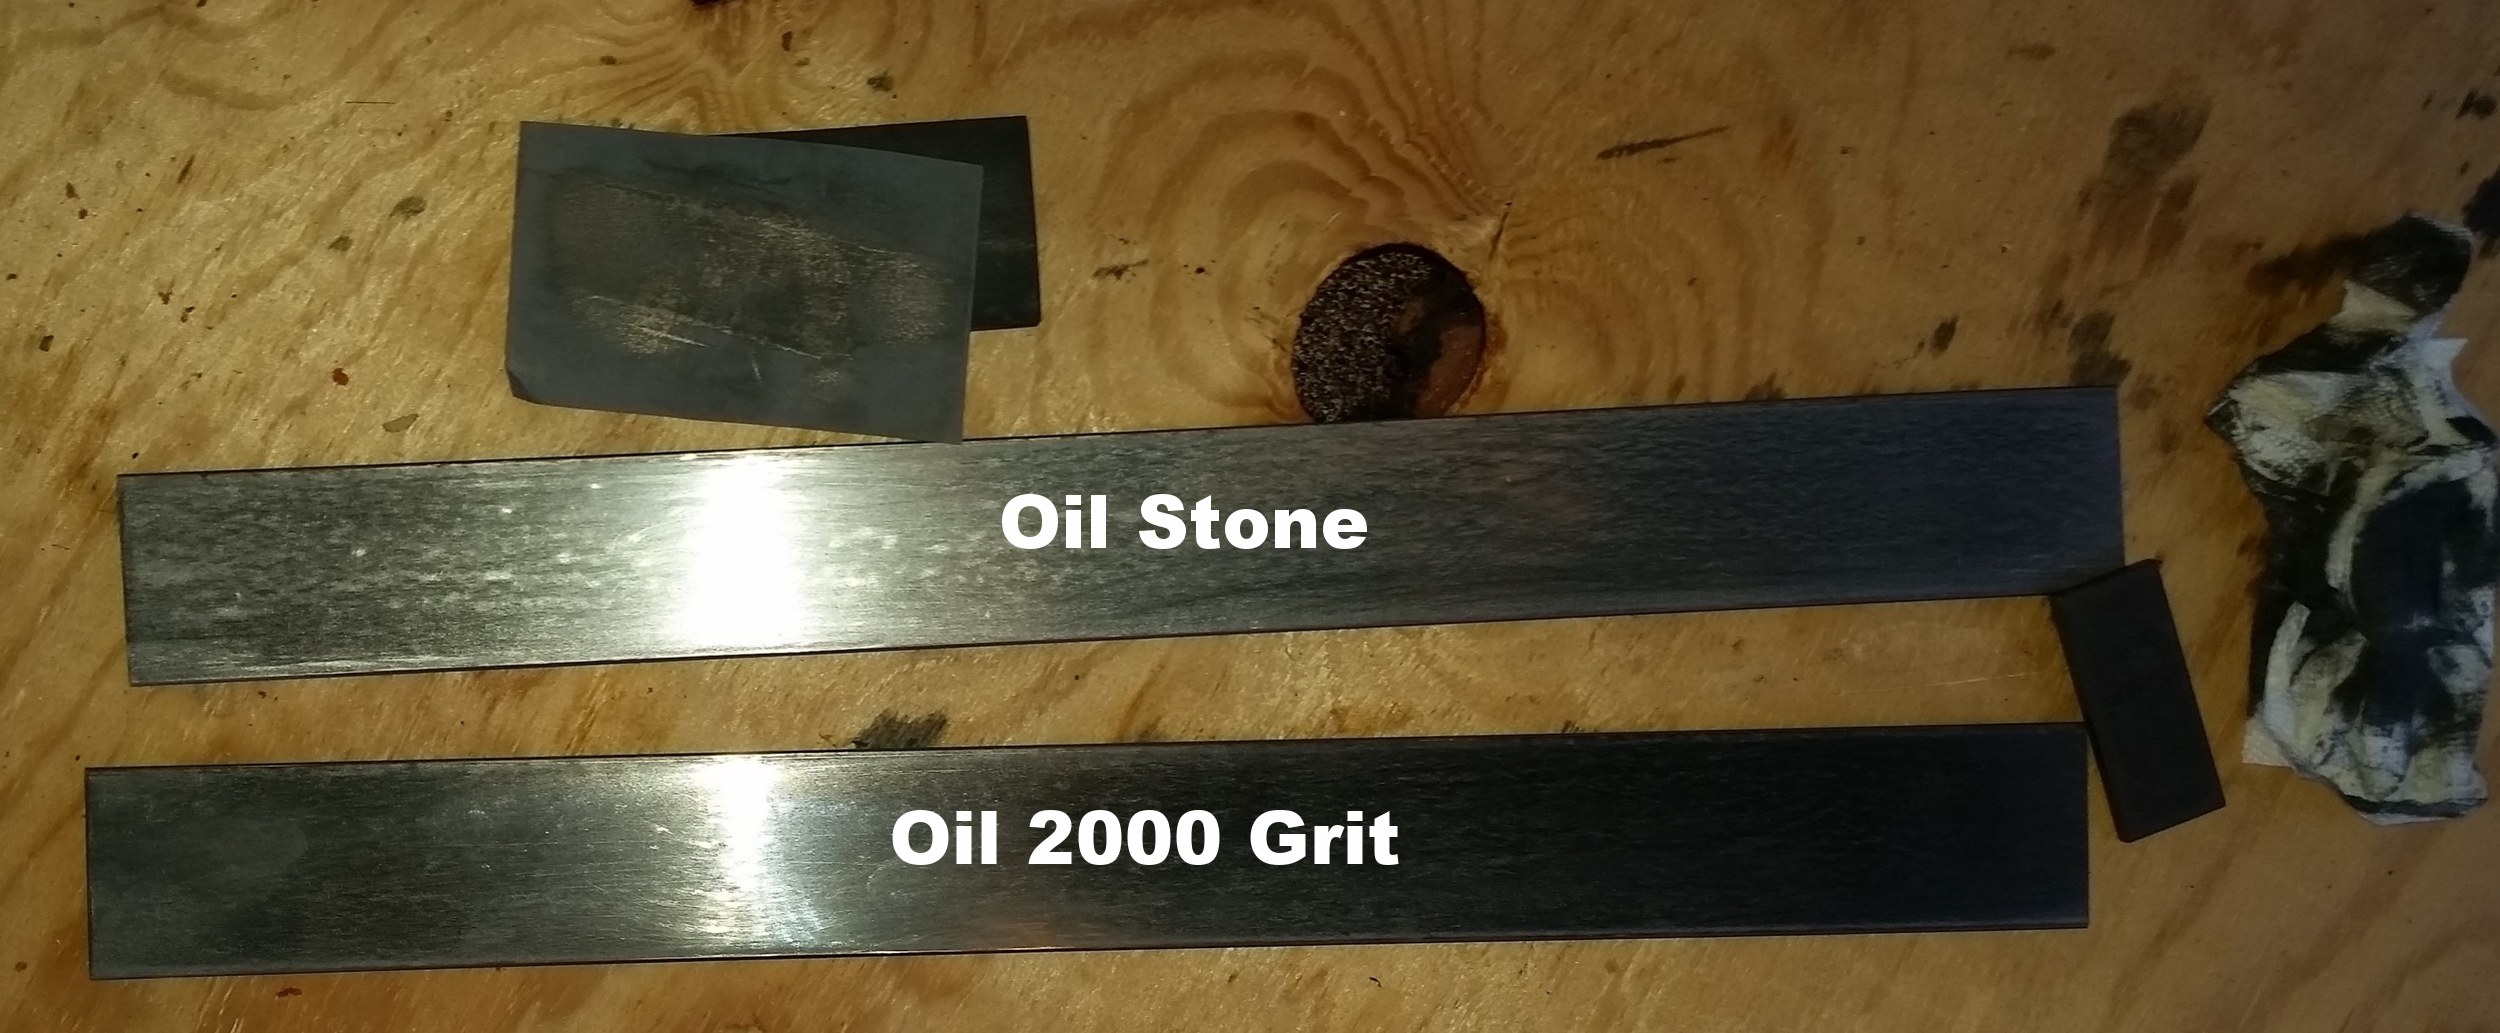
The chainplates are mostly polished after running them on the lathe. The grain in the metal is still apparent but the surface is very smooth. Further polish can be achieved if the client desires a mirrored finish. 

The corners have been radiused to reduce the risk of injury if you bump into them, now it's time to drill the holes in the chainplate.

Careful measurements have been taken and the centers of the holes have been transferred to the blank chainplate. The holes were verified by stacking the chainplate under the old template and the marks lined up with the center of the holes, proving that everything is accurate.

Once everything is confirmed perfect, the drilling may begin! There are a few important points to remember when drilling through stainless steel:

  • It is very hard
  • Heat will kill your drill bit
  • You need to keep everything lubricated
  • Drill slowly
  • Drill with very light pressure

Heat from trying to drill through stainless will cause the drill bit to lose its hardness and dull. To avoid this, you must keep things cool while drilling. To keep it all cool, set the drill press to its slowest speed and keep the drill bit lubricated.

I use transmission oil to lubricate the drill bit because it will begin to smoke if I am pushing it too fast. The oil also keeps the system from creating too much friction (and heat) and helps keep the drill bit sharp for longer. Having a shop vac at the site of drilling also helps keep the metal shavings under control. 

As soon as you start to see smoke or the area runs out of oil, stop and add some more transmission fluid to the site. 

When drilling the holes, be sure that the old chainplate is securely connected to the new chainplate with at least two C-clamps at all times. Having a third clamp will allow you to re-position the clamps without going below two clamps.

Since the old chainplate is your acoustic guide (if you are slightly off center, the drill bit will scrape the side of the old chianplate and alert you that you need to re-center the unit below the bit) you need the old chainplate to maintain itself in the exact same position. You need at least two clamps to avoid any kind of movement; if the template shifts the slightest bit, the holes will be out of alignment!

At the end of it all, you will have yourself a set of new chainplates with properly oriented holes! The next step in the manufacturing process will be to radius the holes to reduce stresses on the corners of the fastener holes.

Chainplate Fabrication: Part 1

Chainplates carry out the stressful function of connecting the stays to the hull. All of the force placed on the stays is transferred to the hull via these metal plates. Chainplates come in a variety of materials, but the most common materials are stainless steel and bronze.

In the world of stainless steel, 316L (the L stands for low carbon) is the ideal material for chainplate fabrication as they suffer the least from corrosion. 

When your chainplates succumb to the effects of crevice corrosion and stress fractures, it is time to replace them. Sailboat manufactures mass produce their chainplates at the time of production, but older sailboats need to have custom made chainplates fabricated as they are no longer in stock.

To manufacture your own chainplates, you need to locate the raw material: 316L Stainless Steel. 316L is readily available in various shapes and sizes, but for chainplates, you want to use "bar stock" or "rectangular". If you have the choice between the two, opt for "rectangular" as all the sides are sided and the metal is actually rectangular. "Bar stock" is mostly rectangular, but the edges are not completely square and you will spend a lot of time surfacing the metal instead of making your chainplates.

When you receive your metal bars, the first thing you need to do is polish them. A smoother surface is easier to spot fractures and cracks as well as being eaiser to keep corrosion at bay. To polish the metal, begin with a random orbital sander with 40 grit paper, then move up to 80 grit, then 120, then 220.

At 220, you should start to see a faint reflection in the metal. The grain of the metal will still be very present at this point but the metal will begin to shine. 

You could continue through finer and finer sand papers, but I like to switch over to a wet stone at this point. Be sure to keep the stone lubricated with a light oil such as WD-40. This will reduce friction and clear the stone of metal dust. If you work dry, the abrasives will clog almost instantly. When the oil begins to look black, I like to wipe it off and start again with clean lubricant.

After the stone, I follow up with 2000 grit sandpaper lubricated with oil. This will produce a good polish which will work as a low quality mirror. Once the metal is "as polished as it can" with oil sandpaper, I switch over to water and 2000 grit sandpaper. A gentle stream of water running over the bar will avoid the black debris characteristic of oil since it is constantly being flushed away. 

I continue polishing with the wet sandpaper until it is a better quality mirrored surface.

The "orange peel" that can be seen in the metal is caused by the grain structure of the crystalline formation of the steel. Further polishing would remove this effect, but it would take considerably more time. Mirrored chainplates are nice from an aesthetic point of view, but do not offer any additional corrosion resistance. Being how these chainplates are hidden away in a locker and in the head, the owner of this yacht was satisfied with this level of polish and fabrication continued on to the next step.

One important point to note, don't drill a single hole in the chainplate until at least this level of polish has been achieved. The sand paper used to get to this level would get torn up by all the edges of the holes. Sanding a solid and smooth surface is much easier on the abrasives.


Crevice Corrosion

Stainless steel is a wonderful metal that "stains less" than regular steel. Regular steel will begin to rust when left exposed to air and moisture as the iron in it will form a layer of iron oxide. Stainless steel will not rust as quickly because it contains more chromium which forms a protective layer of chromium oxide on the surface. This protective layer shields the rest of the metal from the corroding, giving stainless steel its wonderful qualities.

While stainless steel won't rust the way regular steel will, it does corrode in a distinct fashion: Crevice Corrosion. Crevice corrosion occurs in areas where the chromium oxide layer has broken down, usually in areas that are deprived of oxygen or very moist or exposed to acidic vapors.

Chainplates usually live in closed up and tight areas of the boat where crevice corrosion can begin. This in combination with the immense stress placed on these metal pieces can lead to fractures and breaks in the chainplate.

While crevice corrosion does show warning signs, they are often overlooked as they are miniscule. The most common sign of crevice corrosion are horizontal fracture lines running perpendicular to the loads placed on the chainplate.

One recommended method to find these fracture lines is to remove the metal fitting, wash it with acid and scrub it completely clean; then inspect the metal piece under a bright light with strong magnification. As you can imagine, this method is highly impractical!

The method I use is to look closely at the metal fitting with a strong light source aiming at it. I do not use magnification or any other fancy gadget. As a dentist I have a lot of experience with finding microscopic cracks in teeth. I am able to see these fractures with my naked eye, and you can too if you take the time to look closely at the metal in front of you. Imagine that there is a crack in the metal and you need to prove that it's not there. When you see it, you know it's there; alternatively, when you can't find it, you were proven wrong. With this frame of mind, you will be more focused on finding the smallest of flaws in the item you are inspecting. 

Do you see the fracture line?

Do you see the fracture line?

This is the same image but heavily zoomed and contrasted to accentuate the fracture line, along with some helpful arrows point to the crack. Can you see the crack line on the original image?

This is the same image but heavily zoomed and contrasted to accentuate the fracture line, along with some helpful arrows point to the crack. Can you see the crack line on the original image?

These cracks are tiny and tend to occur horizontally across the surface due to the combination of stress and corrosion. Eventually, they will lead to catastrophic failure!

Keep a close eye on your stainless steel fittings for these tiny cracks. The moment you see them, it is time for immediate replacement of that part. 

Bedding Hardware

Whenever you make a hole in your deck, you need to seal it to avoid water intrusion. This is easy enough when you are repairing a hole in the deck with wood or fiberglass, but what about when you install hardware through the deck?

This is where bedding compound comes into play! Bedding compound will seal up any voids that may exist between the item and the deck. This seals out water and moisture, while adhering the item to the deck. Bedding compound also needs to be forgiving, allowing it to stretch and wiggle as the boat twists through the waves and expands during the heat of the day. 

My preferred bedding compound for marine hardware is 4200, manufactured by 3M. While not as popular as 5200, 4200 does an excellent job and is much more forgiving. 5200 is considered a "permanent" adhesive. When 3M (a company famous for making things that stick) says its product is permanent, they mean it! I have seem the top layer of a deck be ripped up with deck hardware that was bedded with 5200. 

4200, on the other hand is just a hare's breath less "permanent" than 5200. This means that it will still seal out all traces of water and firmly adhere the fitting to the deck, but it can be removed with enough persuasion in the future. 

I like retrieve-ability in everything I do. The thought that something is now permanently installed and can never be removed irks me! Whether it be an implant crown that I place in my dental office or a chainplate, I want to have a method to remove it should the situation arise. 

When you use bedding compound, the concept is simple: You want to fill all the voids so that it occupies all the space between the fitting and the deck. To ensure that you have enough compound in there, you need it to squeeze out. Bedding compound is very gooey and is rather hard to clean up; but if you follow a few easy steps, cleanup could be much easier.

In this example, we will be bedding chainplates. The first step is to cover everything you don't want bedding on with tape. Then trim off all the excess tape with a sharp knife. 

Next set the plate over the chainplate on the hull and outline it with tape as well.

When you load up the space around the chainplate with 4200, be sure to get some into the  screw holes as well. 

As you push down on the cover plate, you will see the excess ooze out of the space and onto the tape. You want to see excess ooze out of all the sides. If one area didn't ooze any, it means that there wasn't enough bedding compound in that area and it might be dry. It is strongly recommended to pull the fitting off and add extra compound to the lacking areas, although this will be very messy! This is why it is best to load it up with way more than you think it will need that way you only have to do this step once.

Once the excess has oozed out, simply peel the tape up and the majority of the excess will come off with it. Any extra squeeze out can be wiped off with a paper towel. 

Be sure you see some squeezing out between the cover plate and the chainplate. Many people will focus on sealing the edges of the cover plate but forget to seal along the chainplate, resulting in a leaky deck that will rot out the deck core!

This is an easy process to do, it just takes some time and patience to get it done right.

Galvanic Corrosion

When inspecting your spars, pay special attention to any fittings attached to the spars. Most spars these days are made of aluminum while the fittings are made of stainless steel. The dissimilar metals will lead to galvanic corrosion of the aluminum spar. 

While it is impossible to see under or inside a fitting connection, there are some clues that can alert you to an internal compromises. Galvanic corrosion will cause bubbles to appear around the fittings under the paint. 

Source: http://www.boatus.com/seaworthy/rigging/BUBBLES.jpg

Source: http://www.boatus.com/seaworthy/rigging/BUBBLES.jpg

When you look at your fittings, check to see if the paint is beginning to bubble. If you see bubbles, you need to address this area before the problem gets any worse! 

Another sign of corrosion is white dust emerging from your fittings. This dust is aluminum oxide, usually resulting from galvanic corrosion with stainless steel fittings. 

To avoid these issues, be sure to isolate the two metals. Plastic separators can be placed between the stainless steel and aluminum fittings and lanocote can be placed on the sides of screws and rivets to isolate them as well.

When you evaluate your rigging, take a close look at all fittings and make sure everything looks clean and perfect! Peeling paint is a preliminary sign that something might not be isolated.