Standing Rigging

Clevis Pin and Cotter Pin Orientation

When performing a rig inspection, one of the most often overlooked areas are the clevis pins and cotter pins. While some people may think of these as regular metal connectors, they are actually much more than that!

Clevis pins are metal cylinders that are made of stainless steel and fit into a hole that is a specific diameter in relation to the pin. The pin and hole are such a close fit that the sheer forces on the pin are evenly distributed and the whole assembly is incredibly strong. If you placed a smaller clevis pin in the hole, the pin would deform and break at a relatively low load, simply because the pin was being point loaded by the sides of the over sized hole.

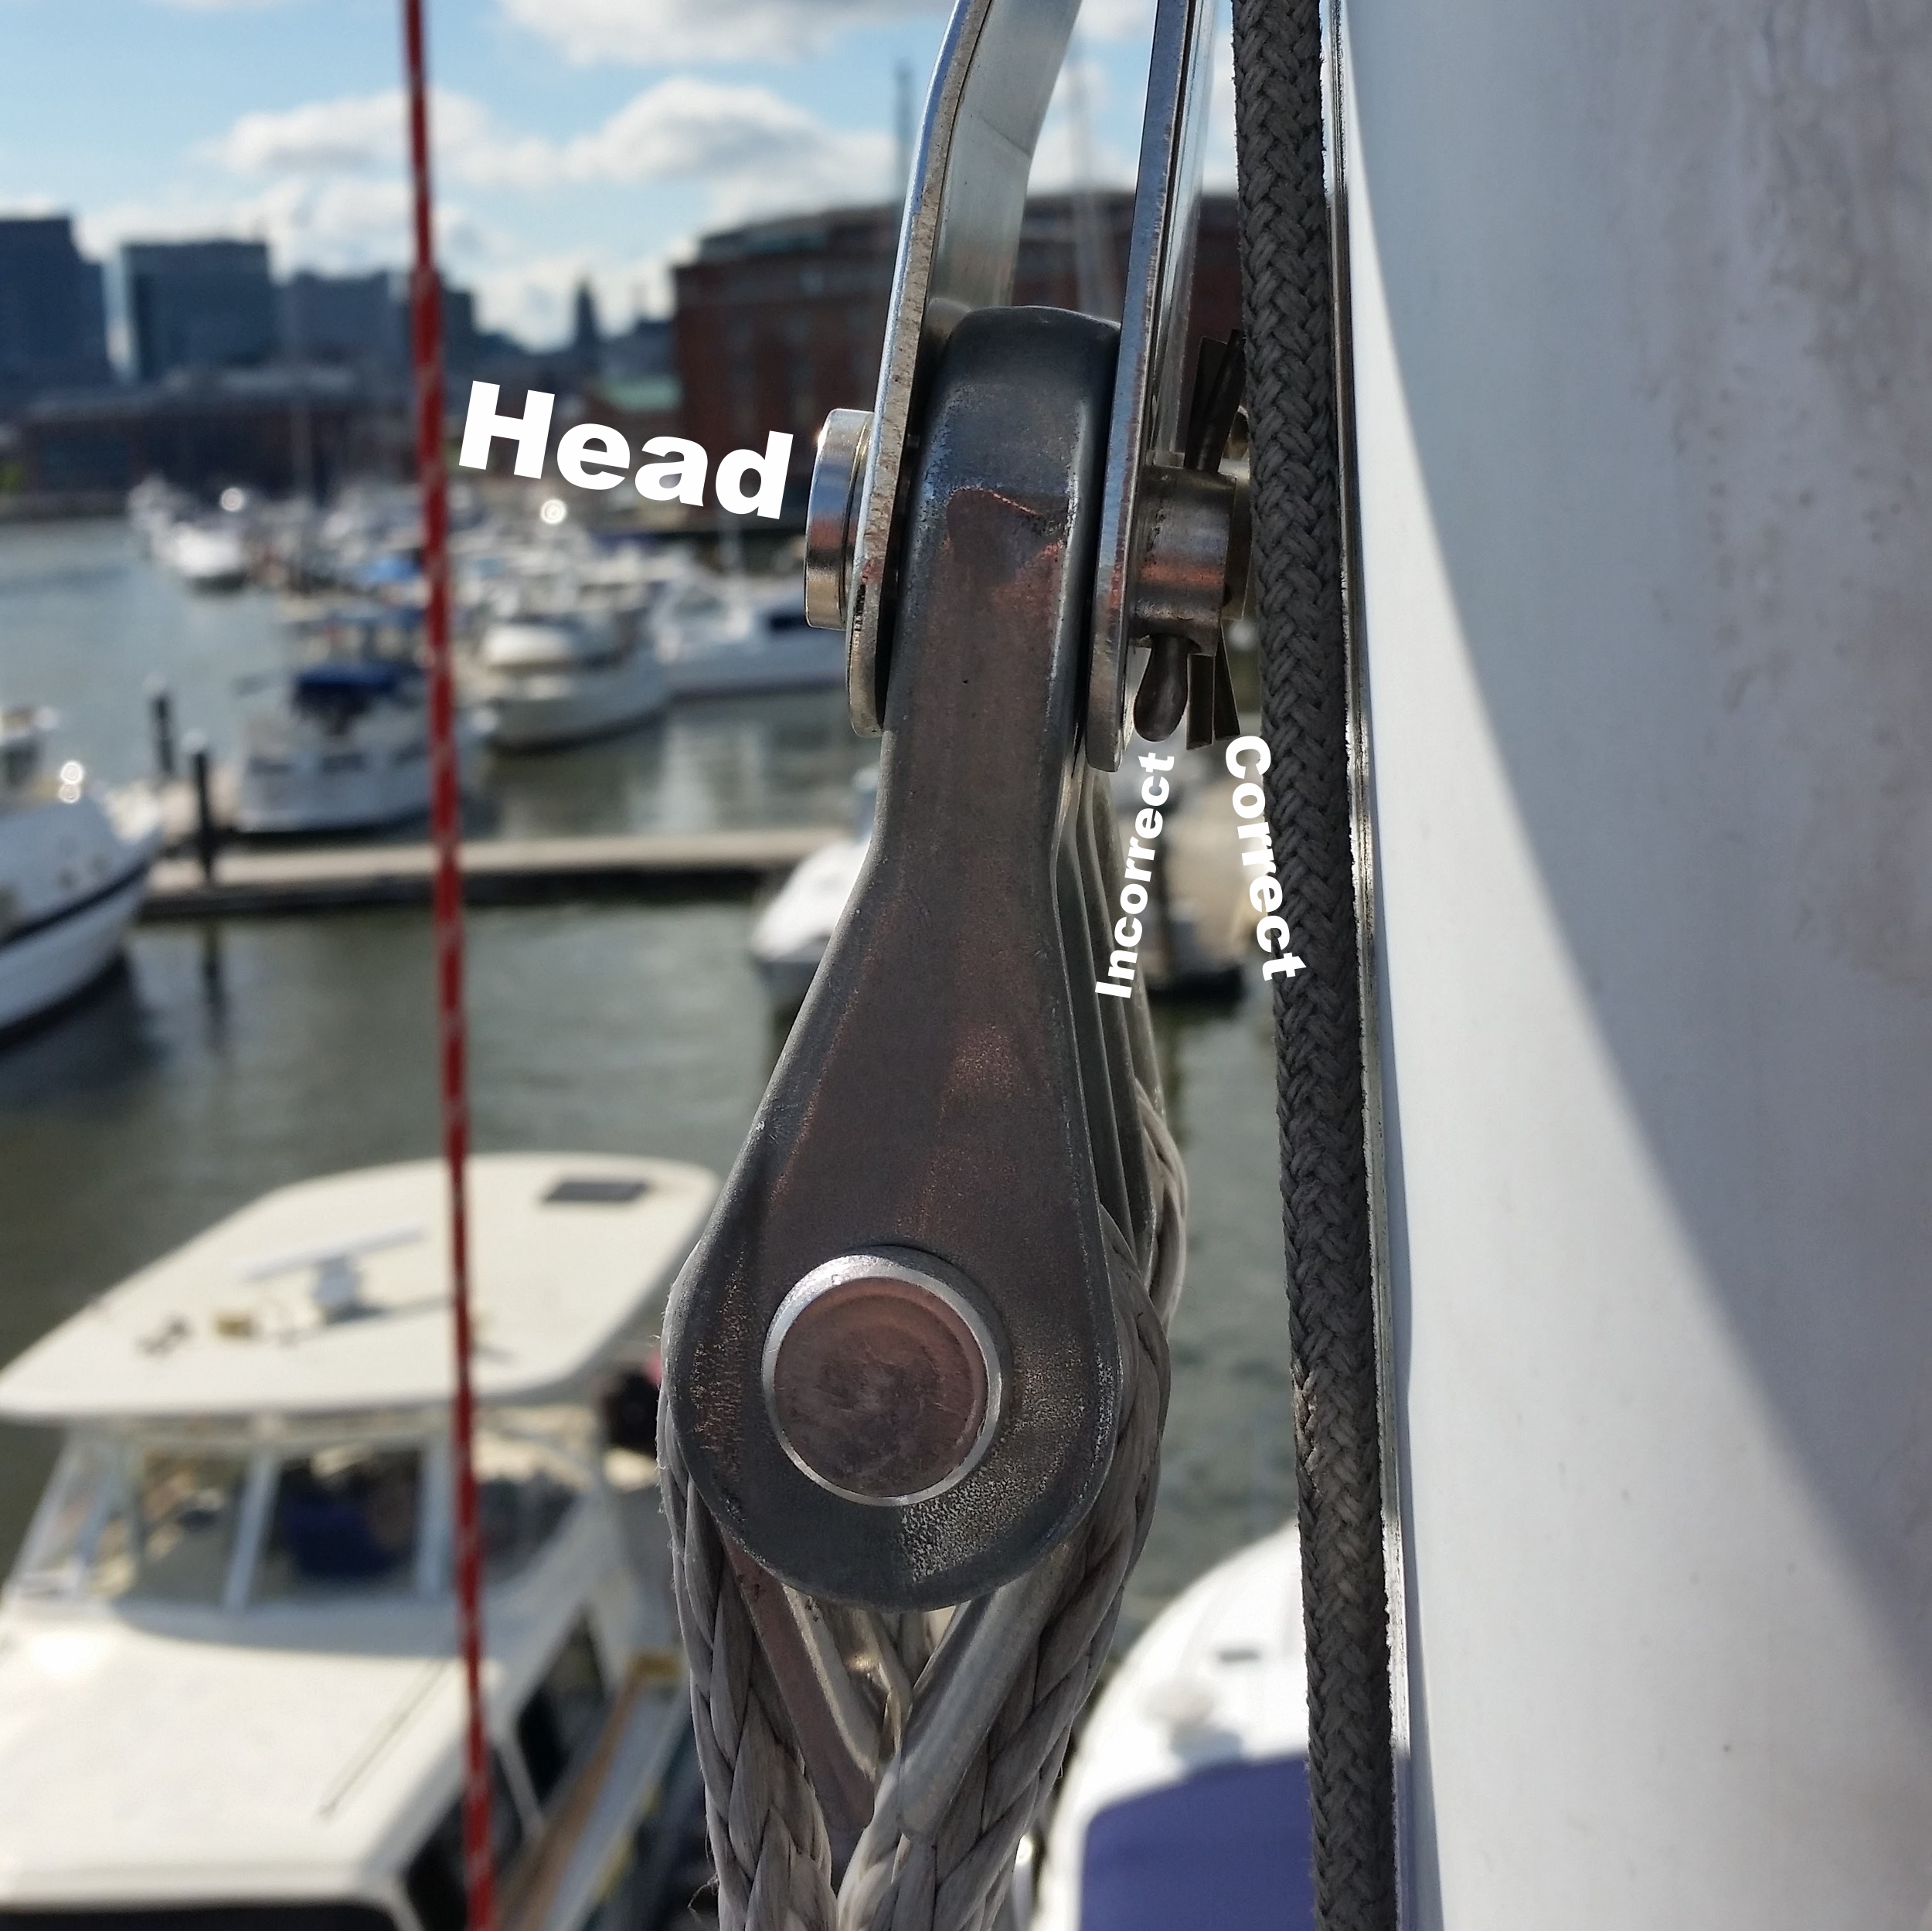
Clevis pins have a head on one end and a hole on the other end for the cotter pin to retain the whole assembly in place. When a clevis pin is installed, it should always be installed so that the head of the pin is higher than the retaining side. 

Secondly, the cotter pin should always be oriented so that the head faces up and the legs face down. The legs should be splayed around 10 to 15 degrees to ensure the pin will not fall out while trying to avoid stressing the metal legs. When the legs are over-bent, they can snap off, making it easier for the pin to fall out.

The reasons for the clevis and cotter pin orientation may seem nit-picky, but they make perfect sense when you factor gravity into the situation. Orienting the clevis pin head up, and the cotter pin head up provides many levels of safety to prevent the stay from coming disconnected.

  1. If the leg on the cotter pin breaks, it will be held in place due to gravity until it is found during an inspection and replaced.
  2. If the clevis pin rotates and the cotter pin is now upside-down; and a cotter pin leg breaks off and the cotter pin falls out or the cotter pin legs are not open enough and the cotter pin slips out: the clevis pin will still be held in place by gravity.

If the clevis pin were placed with the head down, it could easily fall out if the cotter pin were to fail. Orienting the pins with their heads up simply adds more levels of safety to the system, making the connections more forgiving in the event of a failure.

In lieu of cotter pins, ring pins can be placed to secure a clevis pin in areas where there is enough space or where the risk of fouling the cotter pin legs is high. Check stays and running back stays. are typically connected with a ring pin to avoid snagging the headsail if it rubs over the side of the mast. Lowers typically use cotter pins because it is nearly impossible to fit a ring pin between the two stays. Orienting the clevis pins so the cotter pins face each other protects the legs from snagging and fouling any lines or sails. This keeps them safely tucked out of the way, yet easy to service and inspect.

Next time you look over your rigging, be sure to take a close look at the clevis and cotter pins!

Initial Setup of a New Stay

After the stay is run up the mast and connected to the mast tang, the deck level attachment becomes the top priority. There are two ways to set up a stay:

  1. Stay to deadeye to chainplate
  2. Stay to deadeye to turnbuckle to chainplate

I have set up my old rigging via the first method, and this worked well but it was very time consuming. Each time I wanted to tension the stay, I needed to set up the purchase system. This took me a few hours each time I needed to tension the stays. While the system worked well, it was time consuming. In the interest of saving time, I decided to set up the check stays following method #2.

If you wish to have turnbuckles at the end your stays, I still recommend having a deadeye as it gives more flexibility when dealing with creep during the first phase of the dyneema lifecycle. Phase I is characterized by rapid elongation due to creep, which translates into weekly tensioning of the rigging. If you only have deadeyes, you will need to set up the whole assembly each time you need to tension the rigging. By connecting the deadeye to a turnbuckle, the deadeye can be tightened by hand and tied off, then further tensioned with the turnbuckle. Once the turnbuckle is two-blocked (fully closed; it relates to a pulley system when the two blocks are touching), simply open the turn buckle and take the slack out of the stay with the deadeye, then re-tension the turnbuckle. 

If you are going to use turnbuckles permanently, the turnbuckle setup would include a double jaw turnbuckle. If you are only going to use the turnbuckle for a few weeks while you get through Phase I, then simply tying a hitch to the cut end of the stay will suffice. 

Eventually, I will set the check stay up like all my other stays, using only deadeyes; so I cut the 1x19 cable close the the terminal fitting and tied the deadeye to the system. 

The deadeye is simply hitched to the old stay on the turnbuckle with the upper part is assembled as normal. This allows me to tension the stay by simply turning the turnbuckle. Once the turnbuckle is two-blocked, it can be opened and the slack taken out of the system with the lashings, then to be re tightened with the turnbuckle.

Each time the stay feels bar tight, I heave hard on the stay (not really apparent in the video) to apply lateral tension to the stay. This will stretch the stay as it settles the splices. Even though I had hung the truck from the stay, I still had some constructional stretch left in the stay that was removed by this method.

When I began, the turnbuckles were completely open and the deadeye lashings were around 8 inches long. By the end, the deadeye and stay were two-blocked and the turnbuckle only has 1 inch remaining before it was also two-blocked.

Once all the fittings are two-blocked, I will shorten the hitch to the deadeye which will bring the distance down a few more inches. After everything is fully two-blocked and there is nothing left to tension down, I will return to the conventional method using only deadeyes. Even though the end step is the same, I did save a lot of time by holding onto the turnbuckles for a little while.

Rigging Toggles

Rigging toggles are simply connectors placed between the stay and the mast tang. They are typically considered an after thought, since they add between 1.5" to 2" of length to the stay. Typically, if  a stay comes out a bit short, toggles are used to bridge the gap and connect the stay to the tangs. Because of this, toggles have taken on somewhat of a bad image; broadcasting to the world that the stay was measured a bit too short!

The reality is toggles should be used at the mast tang connection, especially with metal rigging! Metal rigging is very unforgiving when torqued, usually resulting in stress cracks. These cracks in combination with crevice corrosion will lead to the early demise of a steel rigged vessel. 

You would think that these wonderful and relatively inexpensive toggles would be in widespread use, but look around and you will rarely see a boat with such toggles. 

Toggles add one more axis of rotation to the stay. When the sail fills with wind and the boat heels over, the mast moves! It might move less than an inch, but it will move laterally. In heavy seas, the boat will be pitching back and forth, and the mast will also scoot forwards and backwards with each wave. The combination results in a mast that will move side to side and fore to aft. If your stays are connected to the tang directly, they would only have articulation for fore and aft movements. Lateral movements would cause stress on the fittings which can lead to premature failure.

The addition of the toggle makes the stay a universal joint so the fittings can articulate fore/aft as well as laterally. This will greatly reduce the amount of stress on the terminal fittings which will extend their serviceable life.

Synthetic stays are much less sensitive to these forces, as they are made of rope which can move around more easily. I reused the toggles that were on my mast for the lowers to place the eye splices in a vertical orientation so that their sides would not be in contact. If I had connected them inside the tang, their sides would have been rubbing, leading to chafe and premature failure. At the masthead, the stays are connected directly to the tang because the space was available. 

While toggles on metal rigging should be considered mandatory, with synthetic rigging, they are considered a convenience item and used to help orient the eye splices as they connect to their mast end fittings.

First Year Inspection

The synthetic rigging has been up and used for the past year now and it's time to perform the yearly rig inspection to make sure everything is holding up well and to identify any problem areas so that they can be addressed before the problem arises.

I did not evaluate the mast head on this climb because I was installing two new check stays for the staysail and time was a concern. I did perform a through evaluation of the lowers and the spreaders.

The stays are holding up very well! I was concerned that the rigging might suffer from chafe aloft when the halyards swing through the wind. If there is any rubbing, there has been no damage from said potential rubbing!

The lowers have settled into their thimbles nicely, with all the strands of the line set neatly within the lip of the thimble. There is no sign of fuzzyness or degredation from UV exposure nor any broken strands. 

One point of relatively low concern is the clevis pin on the aft lower had rotated 180* so the cotter pin is now head down. The legs are properly splayed so there is little risk of the cotter pin falling out, but I still like the cotter pin oriented head up. I tried to rotate this pin, but it was not cooperating with my efforts. Other pins that had rotated were re-oriented to have the head of the cotter pin aiming up, but this one did not and I will have to loosen the stay, climb the mast, orient that pin, and then re-tension that stay. I will first climb to the mast head to inspect the headstay and backstay connections before I worry about a single inverted pin.

The spreaders were my second area of focus. The spreader tip is seized onto the cap shrouds as they pass through the jaws. I wanted to make sure that the small line (5/64" or 1.9mm) has held up well. I did have a few issues with halyards getting caught in the jaws, as well as the drifter rubbing over the spreader tip. To my great pleasure, everything out at the end looked in fine shape with no signs of chafe to the service placed over the stay. If the service were to become severely chafed, I would simply replace the worn service before the stay suffered any damage.

The rigging looks very new and is holding up wonderfully, even in full exposure to UV radiation, harsh winters, and sweltering summers!

On a final note, when you go up the mast to inspect your rigging, don't forget to enjoy the view!

Going up the mast

No one likes to go up the mast, but when you do go up the mast, you should make it as safe as possible. This requires the proper gear and knowledge of how to use it.

There are three important parts to mast climbing

Going Up
Staying Safe
Coming Back Down


Going up

Going up may seem simple, but how do you raise all your weight to the top? You can have a trusted friend grind the main halyard winch to raise you up, but if you can't find a friend who is willing to hoist you up, you might have to go up alone. 

They sell many different systems such as mast steps and mast climbers, but these are systems are bulky and complicated.

Metal mast steps add weight aloft, offer more places for halyards to foul, and are very expensive. They also entice sailors to climb the mast without a harness which can lead to deadly falls from the rigging.

Soft mast steps are attached to the main halyard and offer the same problem, you are tempted to climb them just like a ladder without any safety gear.

Mast climbers are interesting devices that attach to a line and allow you to shimmy your way up the halyard. They work well and offer a way to climb the mast in a hurry, but you are forced to stand up there while you are working aloft. Coming down is also rather tricky since you don't want to accidentally disengage the system and plummet to the deck.

I prefer the use of a gantline to climb the mast, it offers the safety and control of a pulley system and attaches to the bosun chair and safety harness. This system consists of three parts, two blocks and an ascender. These parts are not regular marine grade blocks, but rather blocks designed to hoist humans during rock climbing. They can not accidentally be opened and make the process very safe. The ascender is optional but it makes grabbing the gantline much easier.

The double blocks are made by C.A.M.P. and are relatively available at REI.

The ascender is made by Petzl Ascension and also relatively available at REI. I tie a small piece of dyneema to it and connect it to my harness. When I reach my desired location on the mast, I can let go of the gantline and the ascender will hold me in place while I work. The first time you let the ascender go may seem scary, but trust me, you will be fine (as long as it's tied to your harness!)

To go up, I feed the line through the double blocks and attach one block to the main halyard and run it up the mast. The main halyard is securely cleated to secure the upper block at the mast head and the lower block is securely attached to the bosun chair. I attach the ascender to the gantline and begin pulling myself up. This system offers a mechanical advantage of 4:1 and allows someone with weak arms like myself to hoist my heavy body to the top of the mast. If I were to loose my grip on the line and fell uncontrolled, I would be slowed somewhat by the friction imposed by the block system. I don't recommend testing out a free fall, but it will give you enough time to grab the gantline. If you were falling, the best way to stop your fall would be to grab the four lines involved in the pulley system which will easily bring you to a halt. Best yet is to avoid a free fall all together, which will be discussed in the safety section below.


Staying safe

Safety aloft is the most important thing to maintain while climbing a mast. With this in mind, we shall look at proper safety protocol.

The line for the gantline should be strong enough to support your body weight easily. I use 1/2" Three Lay from New England Ropes. I recommend the use of Three Lay because it offers more warning to chafe and if chafe occurs, it will usually only affect one of the three strands. Two of the three strands will be enough to hold your weight as you lower yourself down from the mast. If double braid were to get cut or chafed severely, your safety could be severely compromised, three lay is a little more insurance to a deadly fall.

The blocks should be inspected before each and every use to make sure they are free of cracks or corrosion. If there is any question, don't go up on them!

All attachments should be made with knots or threaded shackles. Never use a snap hook as a primary attachment. If the snap shackle opens, you will fall straight down.

20150321_125601.jpg

The mast is both your friend and nemesis. It will keep you safe as long as you are close to it. If you move too far from the mast by wind or wave action, you will end up smashing back into the mast. This can be extremely dangerous and damaging! To avoid being swung away from the mast, you want to tie a safety line around the mast and to your safety harness. This will keep you close to the mast at all times. If you need to swing out to the end of the spreaders, simply tie it to the shroud and pull yourself out in a controlled manner. Never jump or swing because if you miss your target, you will smash back into the mast!

Attach a safety line from the bosun chair to your safety harness. This way, if you slip out of the chair, you will still hang by your harness. 

Tie the rope ascender to your harness. This way if you let go of it by accident, you will not fall. The ascender will rise up until the safety line is tight, then it will hold you at that height. 

Carry a messenger line with you so tools or parts can be passed from the deck up to you. This will allow you to send things back and forth without needing to climb or descend to retrieve them.

Tie a line that is secured to you to all tools you value. If a tool slips, it will reach incredible speeds as it plummets to the deck. This will damage your deck when it smashes into it and the tool will then bounce into the water to be lost forever. By tying a line to the tool, it will stay tethered to you and avoid all the damaging consequences.

Never use tools while someone is below you. Have any helpers relocate themselves to the bow or stern. If a tool or clevis pin slips out of your hand and hits them in the head, they could die from brain trauma.

If you are replacing your rigging, never disconnect all the shrouds or stays at the same time. Replace just one at a time and have that stay supported by a halyard. This way the mast head will always be supported. The lower shrouds are much less sensitive to this and can be replaced all at the same time.


Coming back down

After the job is finished, it is time to come back down to the deck. The safest way to do this is slowly. I take a firm grasp on the gantline and remove the ascender and let it hang by its tether line to the harness. I lower myself down hand under hand, never letting myself build up momentum.

Do not let the rope slide through your hands in a controlled manner. The friction will build heat leading to rope burn. When this happens, your instinct will be to let go! If you save yourself from the fall by grabbing the gantline bundle, you will still have rope burn on your hands, making any successive projects painful. This is why you avoid the whole situation by lowering yourself in a controlled manner until you reach the deck safely.

Lower yourself down slowly, and keep the safety line tied around the mast. When you get to the spreaders: wrap your legs around the mast, make sure there are no waves or wakes coming, untie it, pass it around under the spreaders, and tie it again. If conditions are not calm, use two safety lines. Keep the first one tied, tie the second on the other side of the spreaders, then untie the old safety line.

Following these steps you will be able to safely climb, work, and descend the mast without injury or casualty. Remember that anything you want to do will take longer to accomplish aloft and you need to be extremely careful to maintain perfect safety while aloft.