Standing Rigging

Making Wide Mast Wedges

Oval mast sections require wide wedges to spread out the forces on the broad side of the extrusion. The problem is wide wedges are hard to come by! Narrow wedges are easily created by cutting wedges off a board of rot resistant wood. Broad wedges are created via bandsaw or by splitting the board along its grain. 

I do not currently own a bandsaw, and if I did, it would not fit on the boat, so I must resort to the other methods of creating broad wedges.

To begin, you must select a board with proper grain orientation. The grain must run up and down the blank of the wedge you wish to create. If the grain runs across the blank, it will not split properly.

Now that the grain is oriented properly, cut out a blank of the wedge you wish to create from your board in the desired dimensions. Now begin to resaw the blank with a handsaw, this will create a notch which your chisel will follow. Resawing is pretty much the same as "cutting the board into a thinner piece" whereas ripping is "cutting the board into narrower pieces".

Now that the notch is cut, place a beater chisel in the notch and drive it through the grain to split the board. The reason you want to use a beater chisel is this will quickly dull a good chisel. 

As you drive the chisel in, the board will split along its grain, separating the board into two wedged shaped pieces.

Some points to remember when making wide wedges:

When resawing, make sure that the width of board is wider than the gap between mast and deck partner. This will ensure that no matter how the board splits, you will not end up with a wedge that is wide enough to secure the mast.

You want a slight taper to the wedge, that way a longer portion of the wedge is mating up to the mast and spreading the load over a greater area.

If a piece comes out too small, keep it! You might need to shim something else later.


Taking Out Constructional Stretch

After any splice in dyneema, the outer braid will be more open. Upon loading, the fibers will settle back into place and the line will stretch. This is not creep, it is "constructional stretch". It is important to get this constructional stretch out before setting up the stays as it will ensure that the final length is closest to the desired length.

To get constructional stretch out, I like to tie an end to a fixed object and then pull really hard on the line, snapping it tight and letting it go, then snapping it tight again. This will take out most of the stretch. The last bit of stretch can be taken out during tensioning with the deadeyes.

I'm in the process of making new check stays for Wisdom. I connected two off-cuts that were rather long with a very long end to end splice. My next step will be to take the long lines and measure them on the mast to set the eye splices in the desired locations. The problem is the constructional stretch is an unknown factor on these lines. It is very difficult to get the length of the stays perfect with such a large unknown in their length. For this reason, I am going above and beyond with removing the stretch from the stays. 

Pulling hard on the line will remove most of the constructional stretch, but if you want to get all the stretch out of the line, this additional method will be necessary. While this method will remove the stretch and minimize the amount of creep you have to deal with, it is not necessary to do with all your stays. I only did this method on the headstay and the cap shrouds as I didn't want to worry much about them stretching on me once set.

20160412_195322.jpg

To tension the stays, you first need to attach the stay to a very secure object. I use a silver maple tree that has a very extensive root system as my anchor point. Tie the stay to the tree with a small dyneema line, being sure to do various wraps around the anchor point. The small line is not as strong as the large line you are tensioning, so multiple wraps are needed to share the load.

If you are using a tree, be sure to set a sacrificial board on the backside of the tree. This will spread the load and keep the tree alive. Thousands of pounds pulling into the bark would be very damaging to a tree.

Next attach the other end to something rather strong and heavy. I like to use my pickup truck, it weighs just over 7,000 lbs and has a very sturdy tow-ball on the back of it.

The line is laying on the ground and properly secured to the tree and the truck, now we just need to apply some tension to the line. I put the truck in gear and begin driving down the hill away from the tree at a very slow speed (less than 2mph) until the line gets tight and stops the truck. 

At this point, I put the truck back in park and check the splices.

20160414_142356.jpg

Even under this amount of tension, the outer braid can be bunched up and not relaxed yet. This is when you can work the line out and push the fibers into their appropriate positions. I let the truck hang on the line for a few hours and then put it in gear and creep forward a few more inches, then let it hang on the line for a few more hours again.

Since these stays need as much creep and stretch removed from them, I let the truck hang on the line for a few days. This will get all the stretch out of the end to end splices and give me a very accurate length to measure my stays with. 

If you noticed, I'm also tensioning the deadeyes at the same time. I know the system has been exposed to enough tension when the thimbles close and their ends come together.

If you need to get the stretch out of your new synthetic stays and don't have access to very large hydraulic equipment, just know that there are always more simplistic ways to achieve your goals.


Wedging the Mast Deck Partner

The mast may appear stiff and rigid, but it is best to think of it as a wet noodle! In order to get a wet noodle to stand up straight, you need to support it at different points along its length. 

Even though the stays pull down, it is best to think of them as "support points".

The top of the mast is "supported" by the cap shrouds.
The middle of the mast is "supported" by the spreaders and the lowers.
The bottom of the mast is "supported" by the mast step.

The more support points a mast has, the less strength the mast needs on its own; which translates into the ability to use a much lighter and thinner mast. The longer the span between support points, the stronger the mast needs to be. This is the reasoning behind double spreader rigs (2 support points in the middle) over single spreader rigs (1 support point in the middle). As you go adding more and more spreaders, you go adding more and more support (and complexity)! This allows the rig to be taller without adding much more weight.

One advantage of a keel stepped mast over a deck stepped mast is the keel stepped mast gets one more support point: the deck. As the mast passes through the hole in the deck, it is firmly connected to the deck structure; providing an additional support point and making the whole rig considerably stronger.

A keel stepped single spreader rig is as supported as a deck stepped double spreader rig, but without all the added complexity of intermediate stays. Less complexity directly relates to less to go wrong when underway.

Traditionally, the mast firmly connects to the deck is via wooden mast wedges. Nowadays, all sorts of contraptions exist to take the place of wood. I have seen starboard wedges, goo that solidifies (spartite), and countless of other inventions. While advancements in technology are great, it's important to understand why wood was used in the first place.

Wood wedges will hold in place and not slip out due to the high amounts of friction present in the space available. The cellular structure of the wood will crush if the load is too great, protecting the mast. The wood will greatly increase the pressure pushing on the mast to ensure that it is very snug!

Starboard wedges are made of polyethylene, the same stuff used to make dyneema. It is very strong and will not rot. This sounds like an excellent quality to have in a mast wedge! They are also rather hard and if they do dent or bend from an extreme load (the mast crushing down on them) they will not bounce back once the pressure is released. Wood will crush down like plastic wedges will, but it will also swell back up with the addition of moisture.

Spartite will offer a complete seal around the mast, preventing water from intruding (something wood can't offer) but it provides no pressure to the mast. It is also a nightmare to pull the mast! The spartite will not let go and can turn a complicated situation into a desperate situation. Mind you that the yacht owner is paying the crane by the hour to unstep the mast. If it takes a lot of more time due to the spartite, the owner will have to pay the crane for that additional time.

While wood doesn't provide leak protection, this can be remedied with a mast boot. 

When wedging, regardless of the wedge material, it is important to take various precautions. The sides of the mast are actually much weaker than the rounded sections. If you place a narrow wedge in the middle of the side of the mast side and drive it home into the deck, you can very easily buckle the side of the mast! Avoid this issue by using broad wedges on the side with much less tension as you drive them in with a mallet.

On the curved sections (front and back) of the mast, narrow wedges are preferred as they can be tightly packed to provide maximum support the mast/deck partner junction. 

When you are done, it should look like a nice ring of wooden wedges running around the mast as it goes through the deck.

When you cut your wedges, it is best to make the bottom too thin and slowly taper up to too wide. This way the wedge will slide into place and gradually apply pressure to a large section of the mast. If the taper is too great, the wedge will not be able to go in far enough and the support will act more as a pressure point instead of a pressure area.

If a wedge gets stuck before you can drive it home, try to remove it and plane the side a bit to allow it to pass all the way. If you can't get it out, try chiseling some off a corner to loosen it. If that doesn't work, you can go inside and tap the wedge out from the bottom. If you got the wedge close to home but it got stuck a bit early and you can't get it out, you can cut the top off to make it line up with the other wedges so it will fit under the boot. Just be sure the neighboring wedges are perfect to avoid too much pressure in one area.

I would caution away from using a saw to cut the top off a wedge in place, instead use a mallet and chisel. I score the bottom side of the wood, then chop down from the top, splitting the wood along its grain. The split will stop as soon as it reaches the score line. I repeat this process over and over until the top is trimmed off.

The last point to consider is what wood to use for wedges? As you may know, not all woods are created equal. The mast/deck partner is going to live under a boot, exposed to condensation a moisture from leaks, along with poor airflow. This adds up to a dark, moist area with stagnate air which is a breeding ground for rot! This is why it is very important to use a rot resistant wood, such as white oak.

When you buy your piece of lumber, make sure that it is white oak and not red oak. Red oak will rot away in a few weeks in this environment, where white oak will last a long time! Also try to get a rift saw plank, that way your wedges will have their rings oriented so that they run parallel to the mast. This way the pressure from the mast will simply compress the wood instead of splitting the wedges. 

I replaced my wedges because I noticed that the mast was shimming around at the deck. When we would ride up a wave, it would scoot back. When we would come down the wave, it would scoot forward. This instantly became a top priority for my winter projects list. 

The old wedges were long leaf pine, which is also rot resistant (I even reused some of the wedges), but you can see there simply were not enough of them in there to support the mast. Two of the wedges had fallen through the deck partner and were sitting down by the step. Two other wedges were completely loose, held in place by tape. You shouldn't use tape to hold them in, you should use pressure.

After wedging the whole mast, you can see how it is important to look under the boot to see what is really going on in there rather than assuming that it is all in order. Next time you inspect your deck partner, you will know what to look for to evaluate if it needs a little sprucing up or not.

Synthetic vs Wire Standing Rigging

When looking at the materials available to rig a sailboat, you will find a few different options:

Metal Wire
Metal Rod
Synthetic Fibers

These three options offer solutions to the different problems of rigging in their own distinct way. Common challenges to deal with are weight, windage, and strength. Each of the options available offers to deal with these issues in their own way while introducing more problems to the equation. As you will see, there is no perfect or best solution, it's just a matter of finding a solution whose problems don't bother you.

Metal Wire rigging is the most common form of standing rigging today. It consists of thin wire strands spun together to form a very strong cable. Metal wire comes in two flavors, Galvanized 7x7, and stainless 1x19. Stainless took over the scene because it is more corrosion resistant than galvanized steel. Metal wire offers minimal windage and incredible strength. It's pitfalls are high weight.

Metal Rod, also know as Rod Rigging is an evolution from metal wire rigging. It consists of a solid rod of stainless steel that composes the entire stay. Rod rigging offers minuscule windage and high strength, but it is also heavy.

Synthetic Rigging is composed of a variety of different fibers which offer incredible strength and minimal weight, but they do pose more windage when compared to metal rigging.

The take home messages of these three points are:

Metal: High Strength, High Weight, Low Windage
Synthetic: High Strength, Low Weight, High Windage

While the three major challenges of rigging (Weight, Windage, and Strength) are dealt with in their own way by metal and synthetic rigging, each type also introduces their own list of problems.

Metal rigging suffers from corrosion. The marine environment is a grueling place for anything made of metal. Galvanized Steel (7x7 wire) will rust in a few years if left unprotected, leading to the supremacy of stainless steel rigging. Galvanized steel can last nearly indefinitely if properly cared for, this involves worming, parceling, and serving the rigging; and regularly coating it in "slurry" which keeps it well oiled. This will allow the rigging to live in a permanent oil bath which will keep water and rust out. The problem is you need to paint this slurry on the rigging all the time! For your average pleasure boater, this is not an option.

Stainless Steel (1x19 wire) will not rust as quickly when left unprotected and uncovered, but it will suffer from crevice corrosion. These are small cracks that form in the metal which can lead to catastrophic failure when the crack breaks open. 1x19 wire also requires special terminals to allow it to connect to the other fittings used in the standing rigging. These terminals can either be swaged or swageless. Swaged terminals use a large and fancy machine to crush the terminal onto the cable and pinch it with such great force that it is impossible to extract it. This act distorts and stresses the terminal which advances the formation of cracks and crevice corrosion. Swageless uses much smaller tools and a one-time-use cone which pinches the wires in the fitting. Swageless fittings are less prone to cracking and can be repaired without the use of fancy machines.

Rod Rigging is a bad choice, the heads of the rod are beat into shape which causes stress cracks to form. Rod rigging offers no warning that a failure is about to occur, and when a failure does occur, it is catastrophic. When the head separates from the rod, the whole stay disengages from its point of duty, leaving the mast unsupported and at high risk of dismasting.

Synthetic Rigging comes in many flavors: PBO, Vectran, Spectra, and Dyneema are some of the most common options available. Each tries to deal with the problems of synthetic rigging while negating all problems of corrosion. Synthetic rigging will not corrode, even in the harsh marine environment. The problems that synthetic rigging does introduce deal with creep, chafe, and UV degradation.


A closer look at these different fibers is discussed here.

Creep is the permanent elongation of a fiber, and it is a problem that plagues synthetic rigging. There are ways to overcome this problem, usually by sizing the stays in a way that creep is a minimal problem to deal with. Over the life of the say, minor adjustments will be necessary to keep the rigging fully tuned.

Chafe is a serious concern with synthetic rigging. A sheet rubbing on a stay will saw through it if left unchecked. Chafe patches can be placed in areas where chafe is known to occur to protect these areas, also negating the issue of chafe.

UV degradation is a concern, but technology has come a long way and Dyneema has the best UV resistance. The way it works, the outer layer is damaged but protects the underlying layers.

It may seem like synthetic rigging is the answer to our sailing dreams, rigging that wont corrode and has minimal weight! It's drawbacks are the need for constant adjustments and windage.


A final point to consider when selecting the material for your standing rigging is how repairable is it in a remote location? If you find yourself in a remote island or out to sea and notice that a stay needs to be repaired or replaced, will you be able to do it with the tools and spares you carry on board?

It is recommended that boats with steel rigging carry a length of wire equivalent to the longest stay on the boat. This way, if a stay were to break, they would be able to manufacture a replacement stay and continue sailing on. The reason they don't recommend carrying more wire is this spare wire is extremely heavy! If more than one stay is damaged, and you only have wire for one, you now find yourself in a difficult situation.

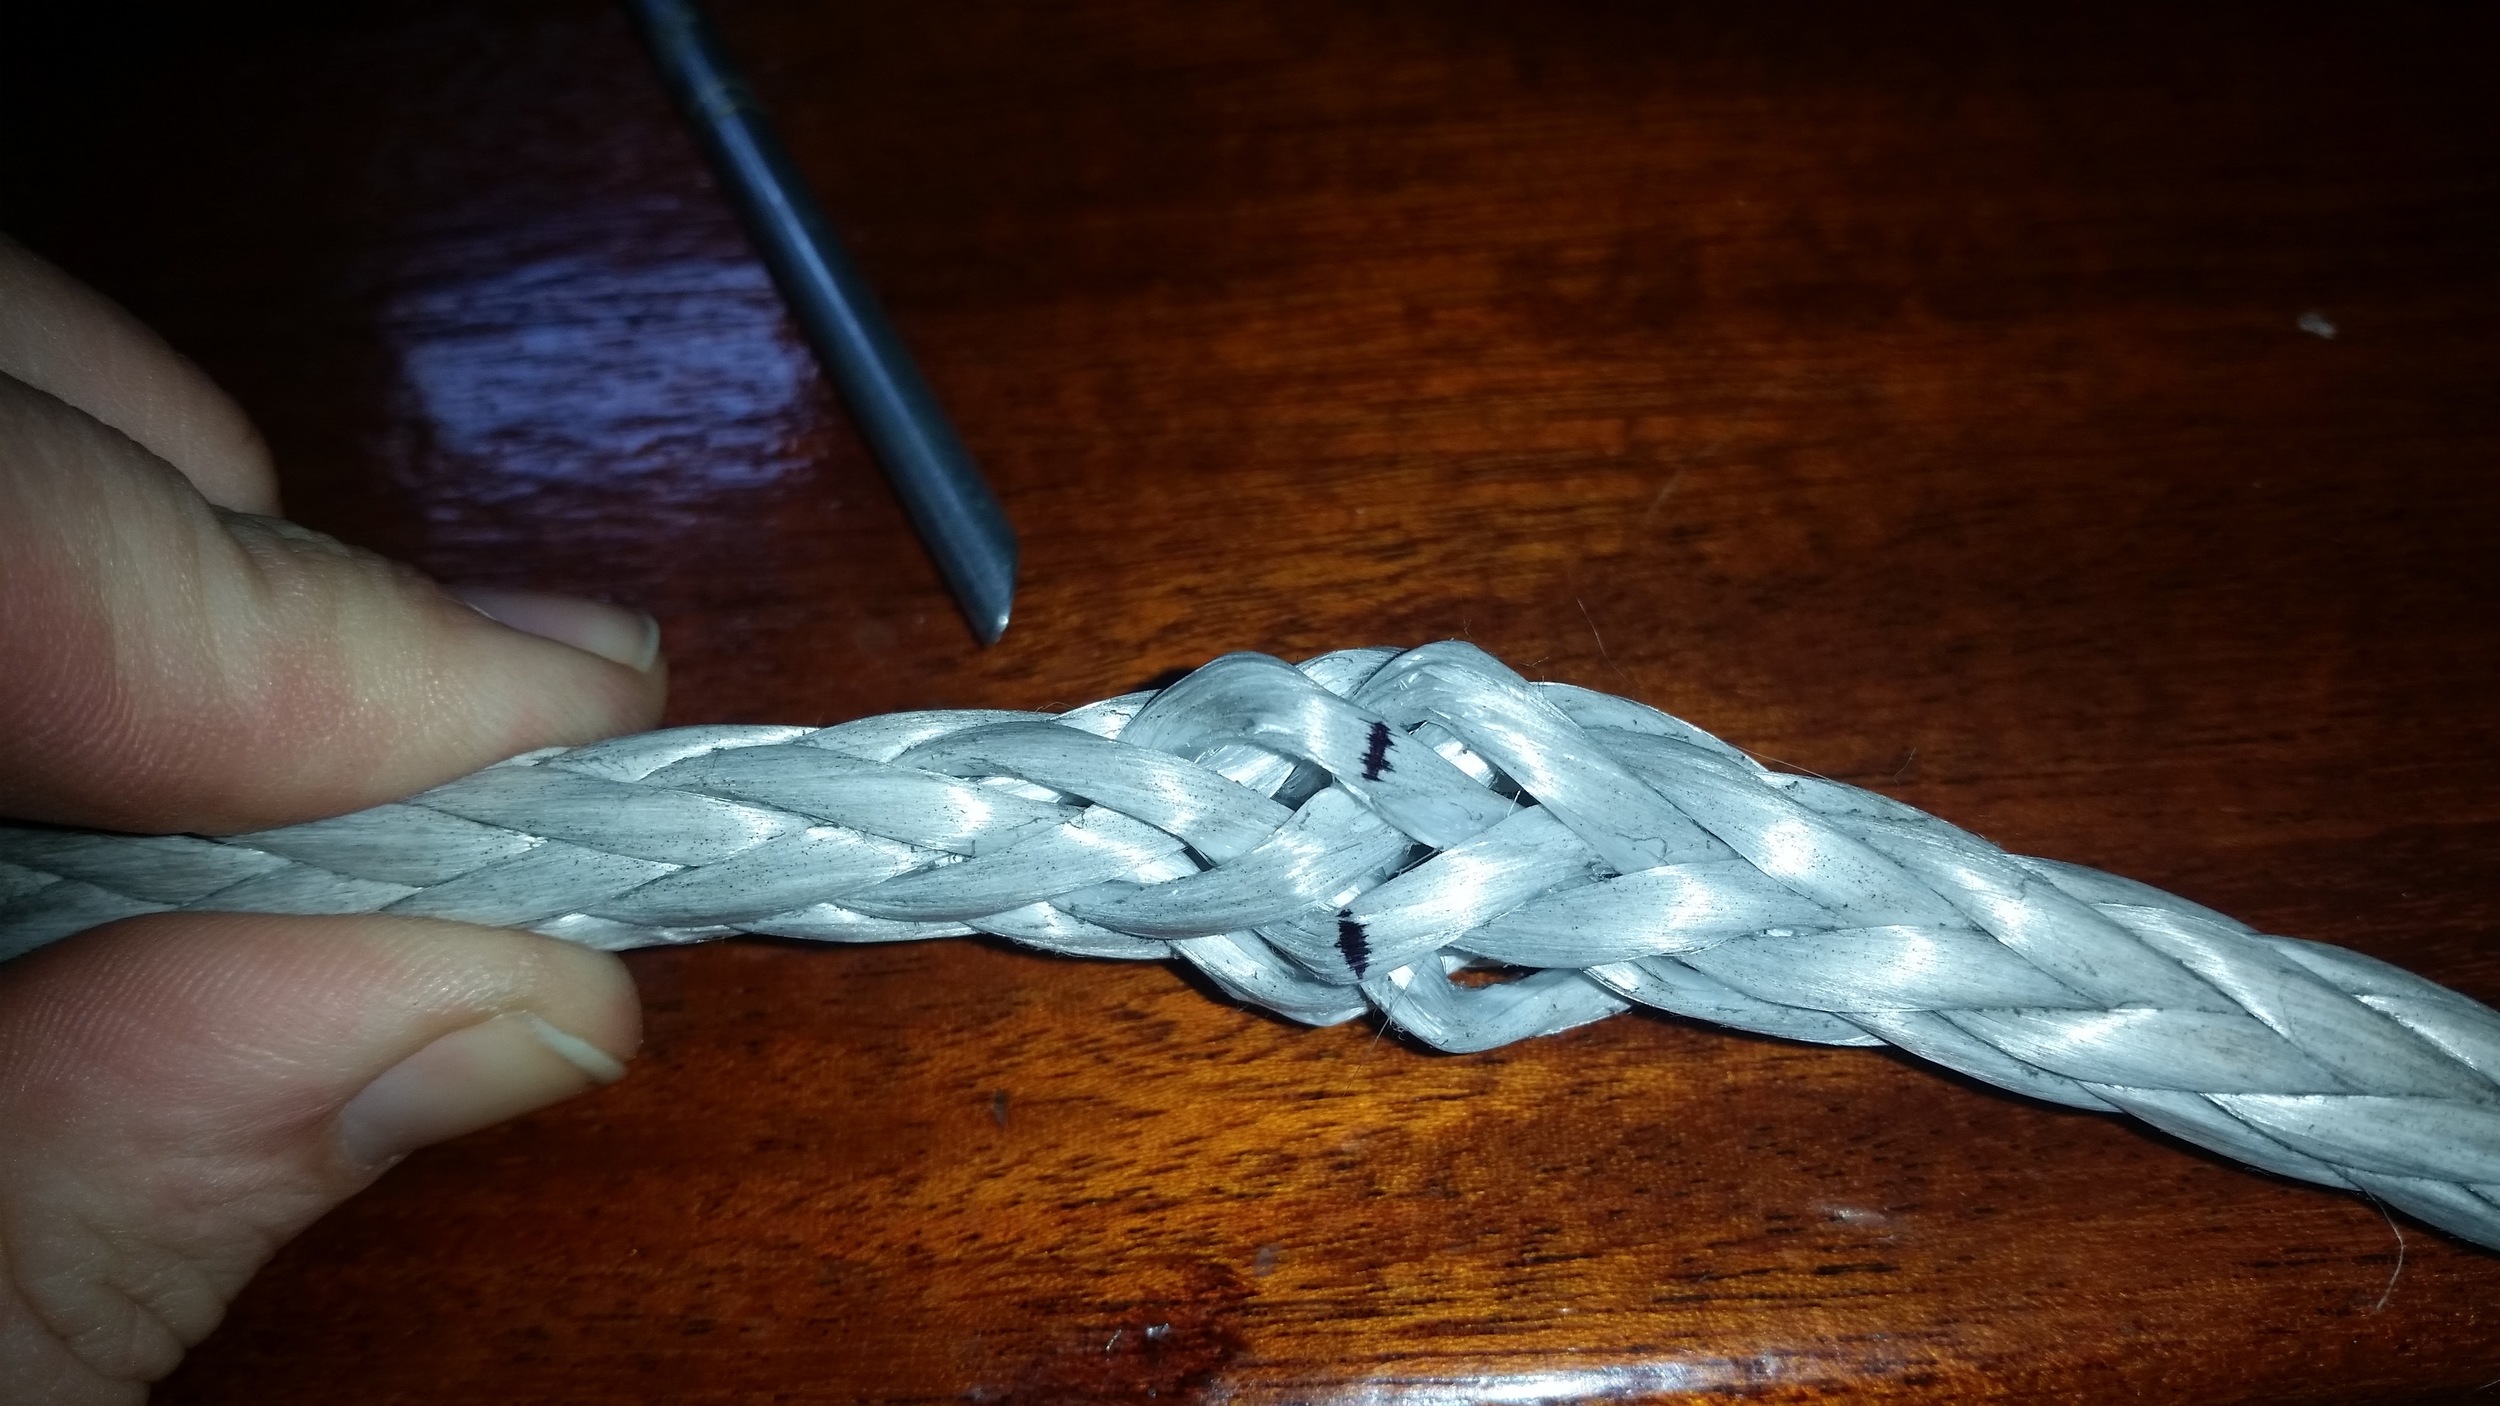
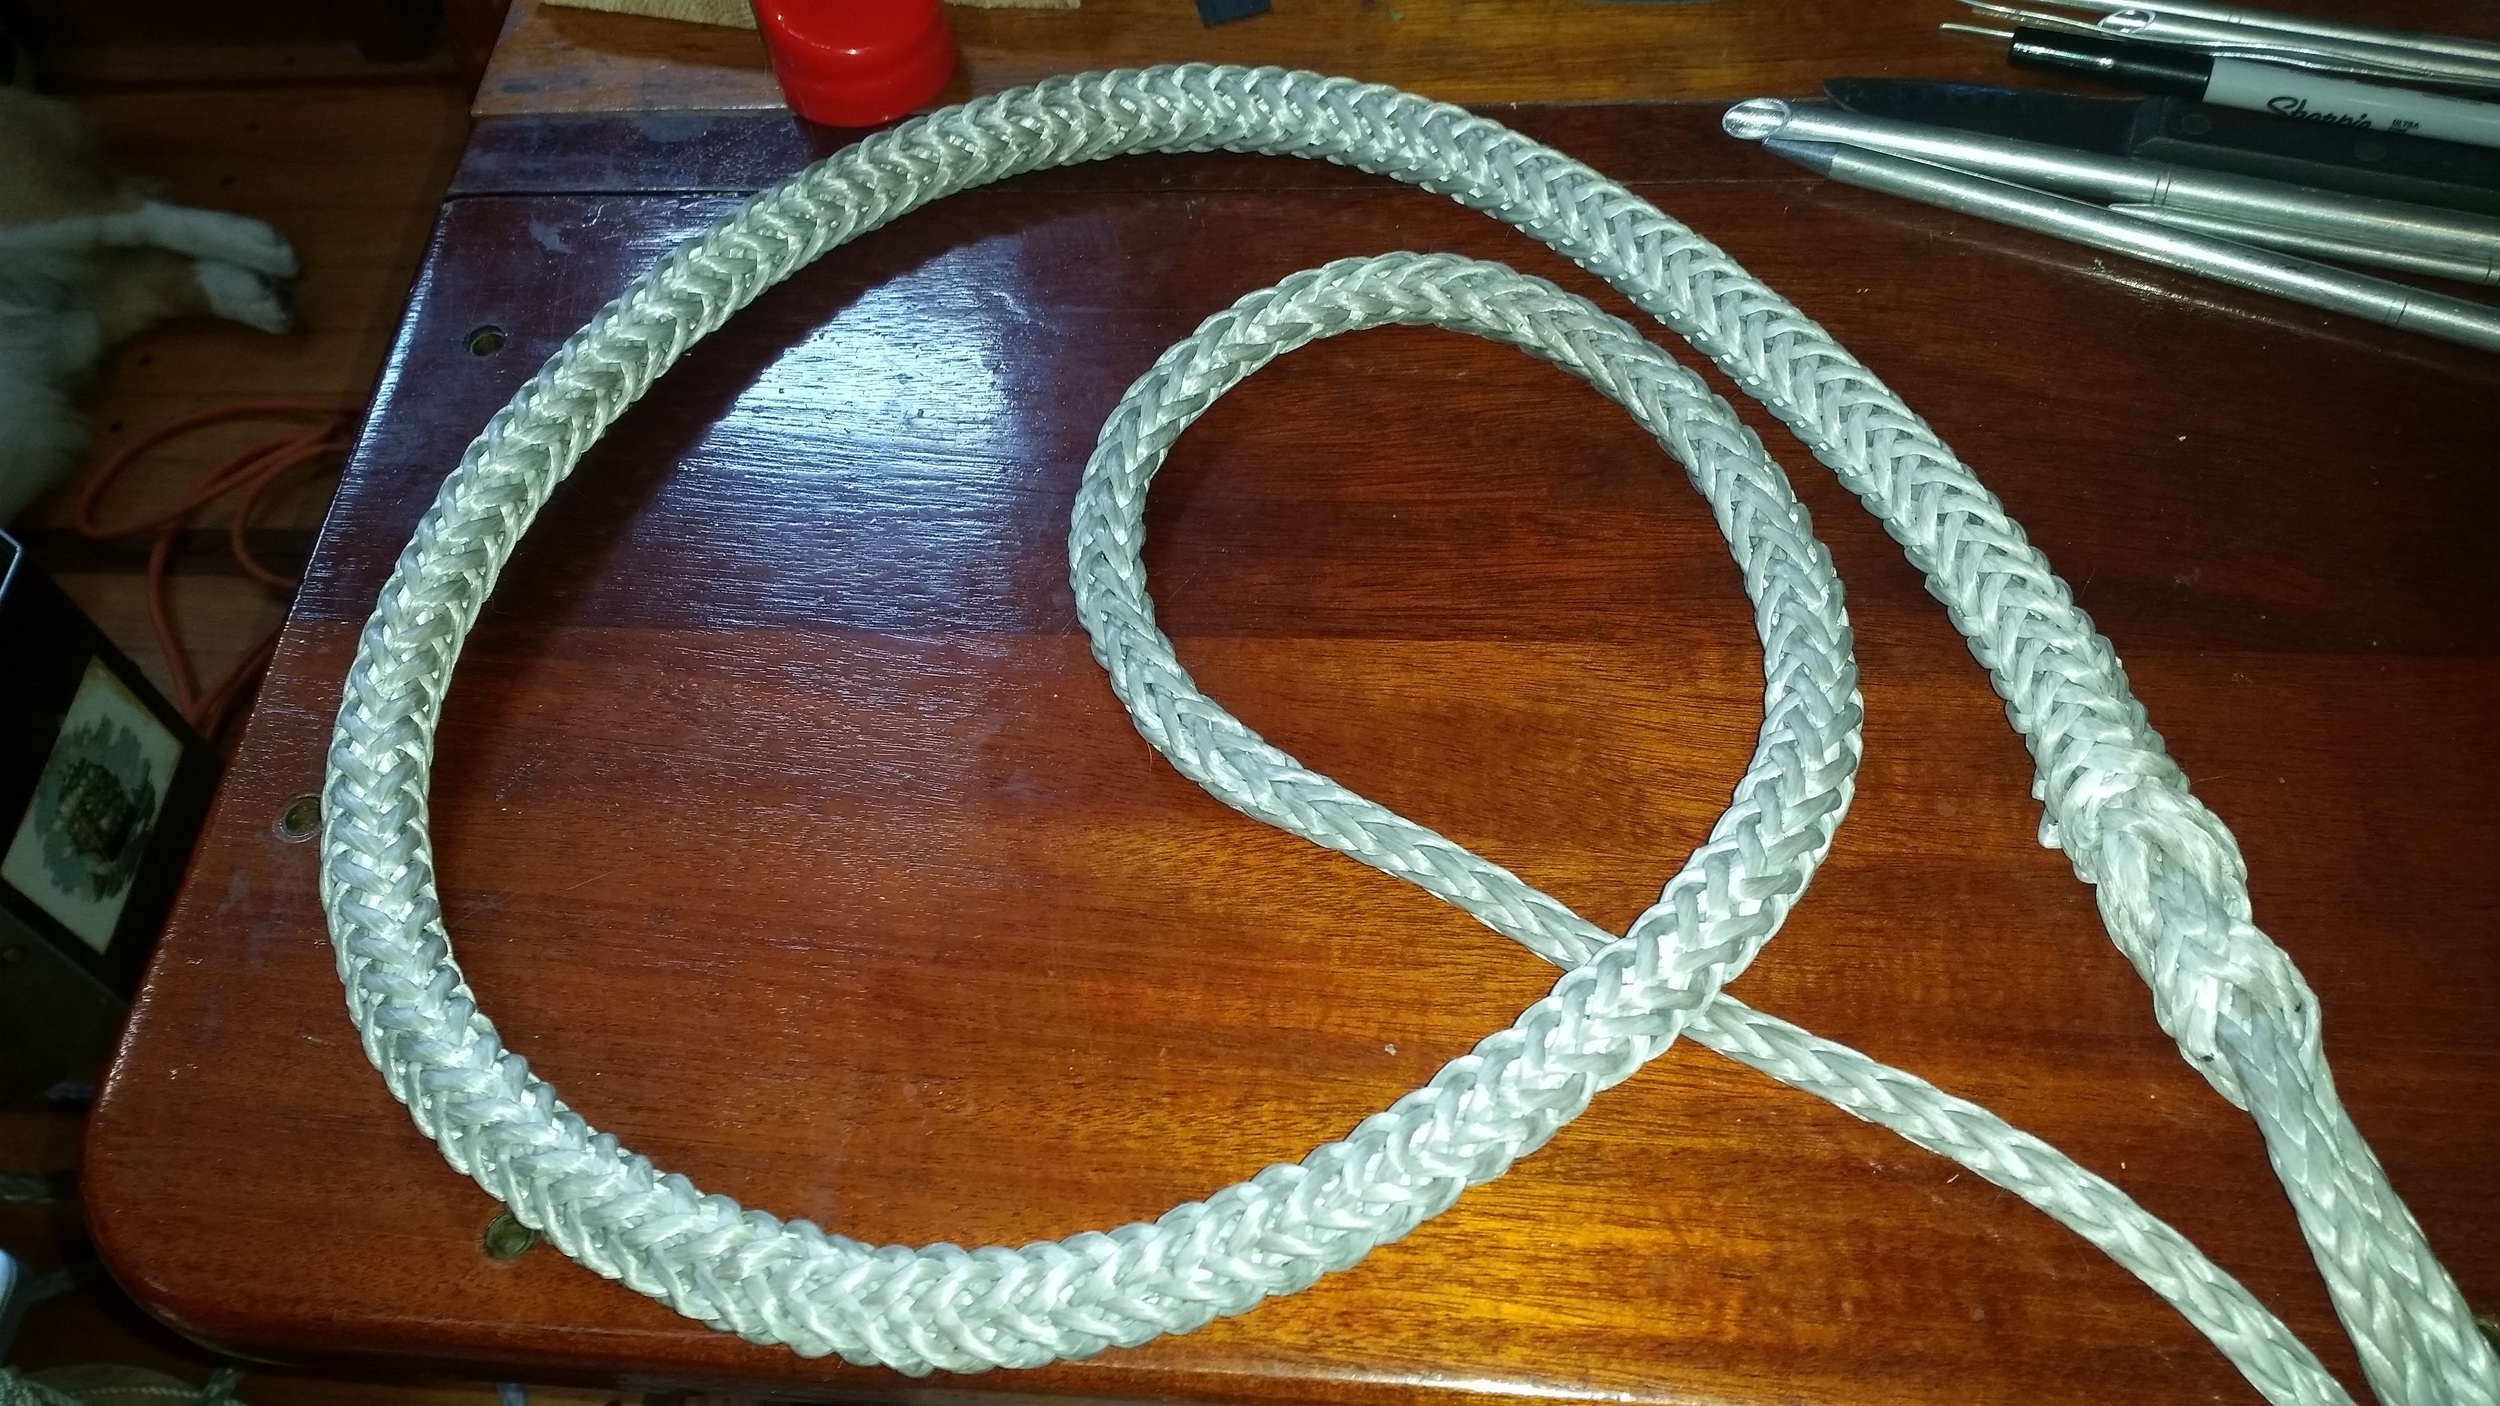
With synthetic rigging, it is very easy to carry a spool of rope in a locker. It doesn't weigh much and stores in a small area. The tools you need are only simple splicing fids, allowing you to repair or replace any number of damaged stays in any location. This repair-ability is a very valuable attribute in favor of synthetic standing rigging.

At the end of the day, you need to ask yourself: "What do you find most important?" and "What downfalls are you willing to work with?"

Metal rigging offers set-it-and-forget-it rig tuning, but suffers from corrosion, high weight, and requires special tools to repair.

Synthetic rigging offers corrosion free, light weight, and ease of repairing; but will need frequent tuning throughout its life.

What do you value most in your rigging? 

Dyneema End to End Splice

Connecting two pieces of dyneema is a simple task, it simply requires a lot of material to bury and a properly executed taper. The end to end splice consists of a Mobious Brummel splice with tapered buries. 

When I re-rigged Wisdom with synthetic standing rigging, I left the storm stays (inner forestay and check stays) in metal. We were going out into the Atlantic and I had no idea if the synthetic standing rigging with deadeyes would actually work. All the people I spoke to at the time about converting over to synthetics told me that it couldn't be done on a boat this size. I came up with this method, but it was till untested. If we came upon a severe storm, I wanted to know that the mast would stay up! Now that I know it works, I'm replacing the check stays with dyneema.

I originally designed an intricate cascading backstay adjuster which turned out to be unnecessary since it could be easily pulled by hand. Now I made 4 pieces for the backstay cascade out of STS-HSR which I never used. They ended up residing as expensive coils in a locker, waiting for the day they would become useful again. Since the checkstays are not under much tension, I decided that I would splice the scrap pieces together to make a piece that is long enough to reach from deadeye to mast tang.

I thought about ditching these pieces of dyneema, but they cost around $6 per foot or $240 for each stay.So I decided to save some money and use these shorter cut pieces by splicing them together to achieve the length I need.

Since these are going to be stays, I decided to go overboard with the buried sections. 9mm Dyneema needs (9mm x 72) 648mm or 25.5 inches of bury. This measurement usually includes the tapered end. I decided to make 25.5 inches of bury before the 25.5 inches of tapered section. This results in a buried section that is 51 inches long! When done on each side of the splice, this makes 102 inches of buried material. 

20160326_152655.jpg

To begin, simply measure the tails and mark the strands with a marker that way they are easy to find later. I like to mark both strands on the V that I want to pass through. If you only mark one strand, you wont be sure if you are supposed to enter or exit above or below the neighboring weave. This might seem like an insignificant concern, but as a dentist and a perfectionist, being on the wrong side of the weave can alter the measurements by several millimeters. 

I marked the section where the splice will cross, and then again for where the taper is to begin. This leads to a rather long tail, as you can see.

20160326_152856.jpg

Then scruch the line together and pass the first line through the opening.

20160326_153156.jpg

I like to secure this crossing with a pin that way the lines don't move while I'm working.

Now, repeat the process on the other line, creating a mobious brummel splice.

20160326_153548.jpg
20160326_153601.jpg

If you are unsure if you properly executed the splice, push back on the tails, if the splice opens up, you did it right! If it won't open up, then you simply passed one line through the other line twice, creating a very weak splice called the "Long Bury Splice". 

20160326_153736.jpg

Now, pull the tail back and insert the fid into the weave to open passage for the tail that will now be buried inside the other line, securing the splice.

Pull the tail into the weave a sufficient distance to bury the whole tail and now pop it out of the weave. 

20160326_154353.jpg

Pull the tail out until the marks you made to begin the taper show and push a pin through with a dirty paw (heat set dyneema is hard and offers a lot of resistance to a passing needle).

20160326_155220.jpg

Now begin the tapering, this is purely mathematical. Count the number of strand rows from the mark to the end and divide by 12. This will tell you how many strands to skip between tapers. In my case, I trim every 5th strand, resulting in a slow and even taper.

Now work the tapered end back into the rope and be proud of yourself! You just completed one side of an end to end splice! Repeat the same process on the other side and you will have yourself a very secure splice! 

I didn't put in a locking stitch since I went overboard with the length of the tails and will be keeping a close eye on the splice as I take the constructional stretch out of the line. If you want to, a locking stitch will offer more security to the splice.